How to Mod your XBOX without modchip (proven)
(v1.0 Jan 04 )
by Iftekb
Last modified: January 11nd, 2004 (brand new year)
IMPORTANT
You may damage your XBOX by modding it without chip.
You may void the warranty if you open your XBOX.
XBOX Live compatibility may be affected.
This may be illegal in some countries.
BACK TO REALITY
I made some dumb mistakes but finally I modded my XBOX without modchip, it
works OK: ) ,
didnt lose any saved games, nor the cds I had copied using original dash.
The original dash stopped working after I copied the free-xevox files, but
now it works fine I
just had to copy the files related to the original dash again, so dont worry
if you cant use the
MS dash for a while. In order to play DVD movies, avi and mpeg files, snes
emulators, 64
emulators, or even Mame, you need some apps, look for them at irc
The gear I used:
1. Torx T-20, and T-10 screwdriver
2. 15W soldering iron.
3. PIV 1.8GHz with Windows XP n network card.
4. hdd_driver.zip
5. dlls nedded by hdd_driver :
MSVCRTD.DLL, MSVCIRTD.DLL, MFCO42D.DLL, MFC42D.DLL
6. free-xevox.rar
6. ernie_and_bert_reloaded.tgz
7. FTP software FlashFXP
8. Crossover cable (RJ45)
9. EvoxM7_ef_FC_1MB.bin
(My XBOX is v1.0 so it needs a 1mb bios, you should get the right bios for
your XBOX version)
Step 1. Download all required software. From irc: http://www.xbox-emulation.co.uk/irc.shtml
free-xevox.rar
hdd_driver.zip
ernie_and_bert_reloaded.tgz
From the Slayer installer
: EvoxM7_ef_FC_1MB.bin
To get the latest Version of the Installer follow these instructions:
* IRC Software: Get your free MIRC Client from here: http://www.mirc.co.uk/get.html
and choose the link closest to you. * IRC Server = snoop.burghcom.com ( IRC
Server Join Command = /server snoop.burghcom.com ) * IRC Channel = #SlaYerS
( IRC Channel Join Command = /join #SlaYerS )
I searched in yahoo the following dlls needed by hdd_driver:
MSVCRTD.DLL
MSVCIRTD.DLL
MFCO42D.DLL
MFC42D.DLL
2ble click Driver.exe to see if everything is ready, you should receive an
error message not related to dlls..
Also in yahoo. -FlashFXP_21_Setup.exe
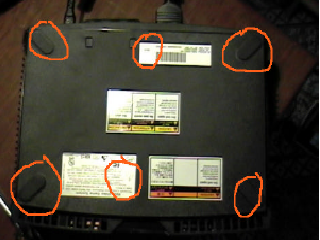
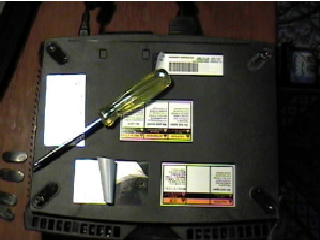
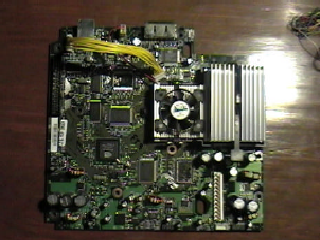
Step 2. Open the XBOX There are 6 screws, one under each pad and 2
under the stickers.
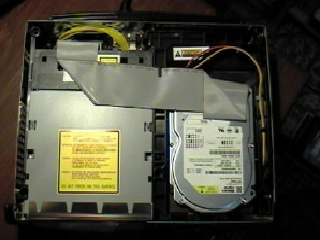
 Once opened it will look like this:
Step 3. Hot swapping. I disconnected
my dvd and cd-writer units from my pc in order to have a free IDE cable. Let
your XBOX rest a couple of minutes so the hard disk stays idle, once tv screen
has faded, with the PC on and the XBOX on, remove the IDE cable from the XBOXs
hard disk and connect it to the PCs free IDE CABLE. It makes some scary sounds.
 Once connected it to the PC go to Control Panel\System\Device Manager, click
refresh. The first time I did it Windows XP displayed a new hardware found
message, the following times it didnt although hdd_driver continued to work
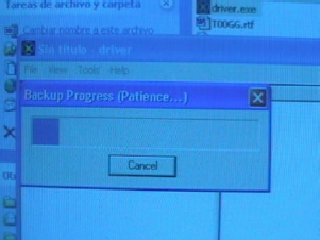
fine. Once plugged and refreshed, run hdd_driver and backup the entire hard
disk Tools \Backup HDD. This took almost 10 min. Dont minimize the window,
just let it do its work : )
Once connected it to the PC go to Control Panel\System\Device Manager, click
refresh. The first time I did it Windows XP displayed a new hardware found
message, the following times it didnt although hdd_driver continued to work
fine. Once plugged and refreshed, run hdd_driver and backup the entire hard
disk Tools \Backup HDD. This took almost 10 min. Dont minimize the window,
just let it do its work : )
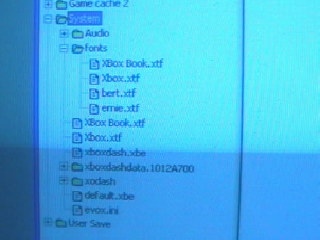
 Step 4. Copy ernie.xtf & bert.xtf to /System/Fonts
hdd_driver tends to crash easily, so its better to use the right click, insert
option to copy files. Copy ernie.xtf & bert.xtf from ernie_and_bert_reloaded.tgz
to the /System/Fonts directory. Rename Xbox.xtf to Xbox.xtf.old and XBox Book.xtf
to XBox Book.old, insert in /System default.xbe and evox.ini from free-xevox.rar.
Connect XBOXs hard disk back to its place and reboot XBOX.
Step 4. Copy ernie.xtf & bert.xtf to /System/Fonts
hdd_driver tends to crash easily, so its better to use the right click, insert
option to copy files. Copy ernie.xtf & bert.xtf from ernie_and_bert_reloaded.tgz
to the /System/Fonts directory. Rename Xbox.xtf to Xbox.xtf.old and XBox Book.xtf
to XBox Book.old, insert in /System default.xbe and evox.ini from free-xevox.rar.
Connect XBOXs hard disk back to its place and reboot XBOX.
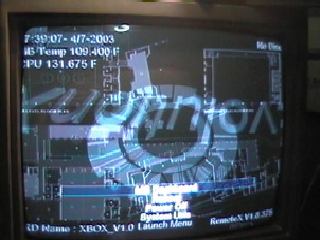
 Turn on the XBOX,
it will boot to the evox dash.
Turn on the XBOX,
it will boot to the evox dash.
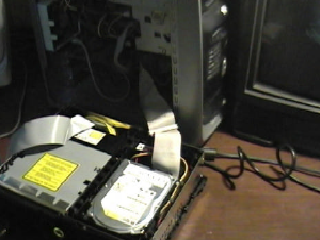
 Step 5. Time to solder. Remove the Hard disk
and the DVD drive, and take out the motherboard :
Step 5. Time to solder. Remove the Hard disk
and the DVD drive, and take out the motherboard :
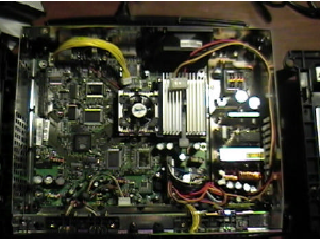
2 points of solder are needed
to flash the TSOP.(If the TSOP is sharp an extra cable is needed)
Some common
TSOP are:
MACRONIX - MX29F022NTPC Sharp -
LHF08CH1 SST -
SST49LF020 ST - M29F080A,
M29f002BT
The following pics show the location of the points needed for XBOX
v 1.0, you should check the points needed for your version on : http://www.xbox-scene.com/articles/tsop-images.php
My XBOX is a v1.0 with an ST - M29F080A (These days Im living in Mexico,
and thats the most common here.)
Point #1
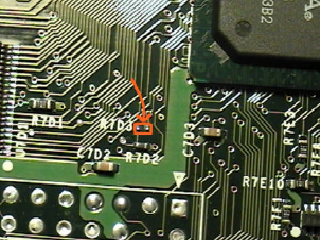 You need to drop a small amount
of solder here so as to join these two points on the board
You need to drop a small amount
of solder here so as to join these two points on the board
.
Point # 2
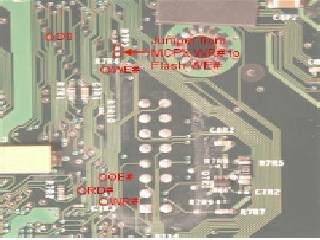 And
also these two points, the ones in the square, that are under the board. (
sorry for the pic)
And
also these two points, the ones in the square, that are under the board. (
sorry for the pic)
Step 6. Flash TSOP
Put the motherboard, DVD and Hard Disk
back in the XBOX, turn it on, it will boot to the evox dash again, go to settings,
set to yes the following options: SETUPNETWORK
YES STATIC IP YES
Youll ping
the IP of your XBOX, eg. 192.168.0.10, open Flash FXP and connect to that
ip ,
Username: xbox
Password: xbox
The username and password are established
in evox.ini
The free-xevox doesnt have the flash bios option enabled, it
looks like this: # Item "Flash BIOS",@1
I used the ini file from the Mech
Assault Linux Loader, but I didnt have the bios where it looks for it so
it just showed me an Unwriteable error but the points were OK, so ensure
that your ini file has something like this (these lines are taken from a Slayer
installer):
In [Menu] , SECTION Root: Item "7-1) Flash 1MB MOD or v1.0-1.1
TSOP w/ EvoX -M7 EjectFix ",@270
An then some lines below, after the SECTION
Root part :
[Action_70] Info "Flash 1MB MOD CHIP or Xbox v1.0-v1.1 TSOP
"
(some warning lines)
flashbios "\Bios\EvoxM7_ef_FC_1MB.bin"
IMPORTANT:
The line flashbios "\Bios\EvoxM7_ef_FC_1MB.bin"
does the magic, it will look
for EvoxM7_ef_FC_1MB.bin in c:\Bios, if the file isnt there, it wont flash
the TSOP. If u cant find similar lines in your ini file, either copy these
ones or get the ini file of a slayer distribution. The @270 at the end of
the line will execute the lines at [Action_70] , yup @270 to 70, its ok. Before
flashing your bios check the instructions in the ini file, if the flashing
includes formatting your drive, then either find another ini or comment the
formatting lines, it is not necessary at this point to format your drives.
So lets go on.
Choose Backup, it will create c:\Backup , copy that directory
to your hard disc, create a directory Bios in c:\ And copy EvoxM7_ef_FC_1MB.bin
there or the bios file you want to use.
Flash the bios.
Turn it on, go to
Settings and in Bios you should no longer see Original but EvoxM7
or
the name or the current bios youre using, some skins wont recognize the bios
but dont worry.
And thats all , your xbox is ready to rumble!! COMMENTS.
The extra cable is only needed if you have a SHARP TSOP, believe me I soldered
that, unsoldered that , broke the trace line, and it still didnt work with
my ST TSOP , just because the ini file looked for the bios somewhere else.
If you get an error telling you that your media is unwriteable, check that
the ini file looks for the bios in the right place!!
I want to thank Raylye for his knowledge on XBOXing. Thanx dude!